Hello! Before starting the tutorial on how to point a domain to Cloudflare, there are a few things that need to be prepared as practice resources. Here are the resources you need to prepare:
An active domain: Make sure you have an active domain that you want to integrate with Cloudflare.
Access to your domain registrar account: You need to have access to the account where the domain is registered (for example, GoDaddy, Namecheap, or other registrars).
Cloudflare account: If you don’t have an account yet, you’ll need to sign up at Cloudflare to create a free account.
Current DNS details: It’s a good idea to save or note down the current DNS settings before making any changes, just in case you need to revert them.
If everything is ready, we can start the steps to point your domain to Cloudflare.
What is Cloudflare?
Cloudflare is a technology company that provides Content Delivery Network (CDN) services and Distributed Denial of Service (DDoS) mitigation. As one of the leading content service platforms, Cloudflare acts as an intermediary between users and the website's hosting server. When someone accesses a website, the request passes through Cloudflare's network, which consists of numerous servers distributed across various locations worldwide.
In other words, Cloudflare offers speed and security as its key features. Since Cloudflare is a Content Delivery Network (CDN) service, it essentially duplicates the content on a domain across all Cloudflare servers around the world. This means that users accessing that content will be directed to the server closest to them.
Without further a do...
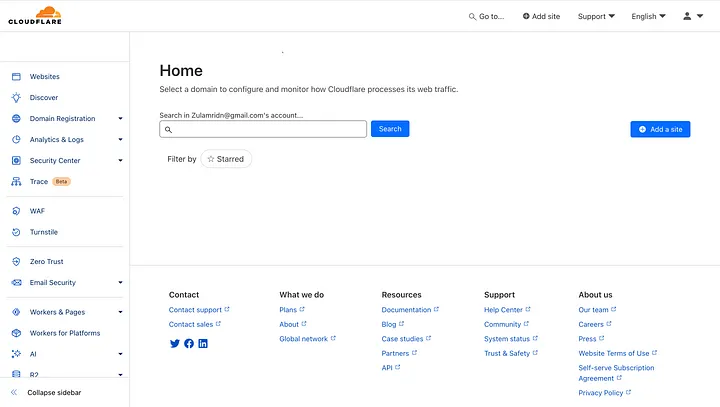
Step 1, Log in to Cloudflare, and once you're successfully logged in, you will be directed to the Cloudflare dashboard.

Step 2, Click on Add Site, and you will be directed to the domain registration page.

Step 3, Register your domain by entering the domain name you want to point to Cloudflare. In this tutorial, I registered zuldev.xyz, a domain I purchased from one of the providers. Then, click Continue, and you will be directed to the Plan page.

Step 4, Select a usage plan. On this page, you will be presented with several feature options at different price points. For this tutorial, I will choose the Free Plan. Then, click the Confirm Plan button, and you will be directed to the DNS page.

Step 5, On the DNS page, you'll be prompted to perform a scan of your DNS records. However, we'll register the DNS manually. Click on the Website menu in the sidebar, and you'll be taken back to the homepage.

Step 6, You will return to the main page, where you'll see the domain you registered listed, but the nameservers for that domain are not yet active. Click on the domain card, and you will be directed to the domain details page.

Step 7, After entering the domain details page, click on the DNS menu and select Records. Here, you will see the nameservers for your Cloudflare account. These nameservers need to be registered as the nameservers for your domain through your domain provider's dashboard.

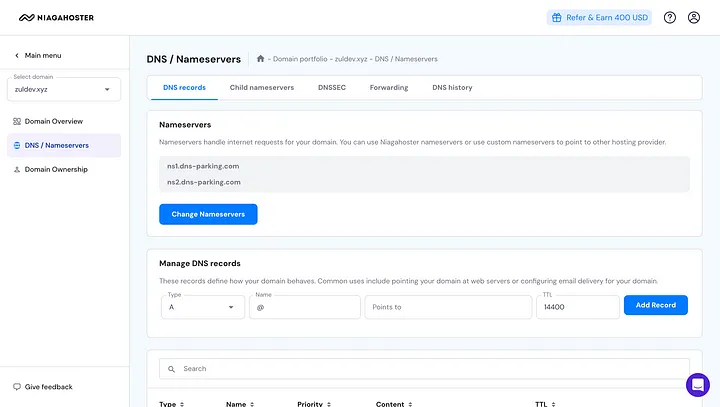
Step 8, The next step is to log in to your domain provider’s dashboard and navigate to the DNS Management page.

Step 9, The next step is to change the nameservers for your domain to Cloudflare’s nameservers by clicking the Change Nameservers button.

Step 10, After successfully changing the nameservers, click Save. Your domain will now be pointed to Cloudflare. Please allow some time for the nameserver changes to propagate; this process typically takes up to 24 hours.
In conclusion, pointing your domain to Cloudflare is a straightforward process that enhances your website's performance and security. By updating your domain’s nameservers to Cloudflare’s, you leverage their global network to improve content delivery and protect against various online threats. Remember, DNS changes can take up to 24 hours to fully propagate. Once completed, you’ll enjoy the benefits of Cloudflare’s robust CDN and security features. If you encounter any issues or need further assistance, Cloudflare’s support resources are available to help guide you through the process.
